WWI · CHAPTER 5 ·
Trench warfare on the Western Front
Chapter 5 of The Great War, 1871–1923: “The Trench”
After 1914 the Western Front settled into a line of trenches about seven hundred kilometres long, from the North Sea to the Swiss border, that barely moved for almost four years. Machine guns, barbed wire and artillery broke exposed attacks, and railways let defenders bring up reserves faster than attackers could advance.
Chapter 5 is included with every paid plan. WW2 is free in full, and chapter 1 of every atlas is free. A free account opens 3 more chapters a day. Starter, at $9 a month, opens all 21 with no daily limit — see the plans.
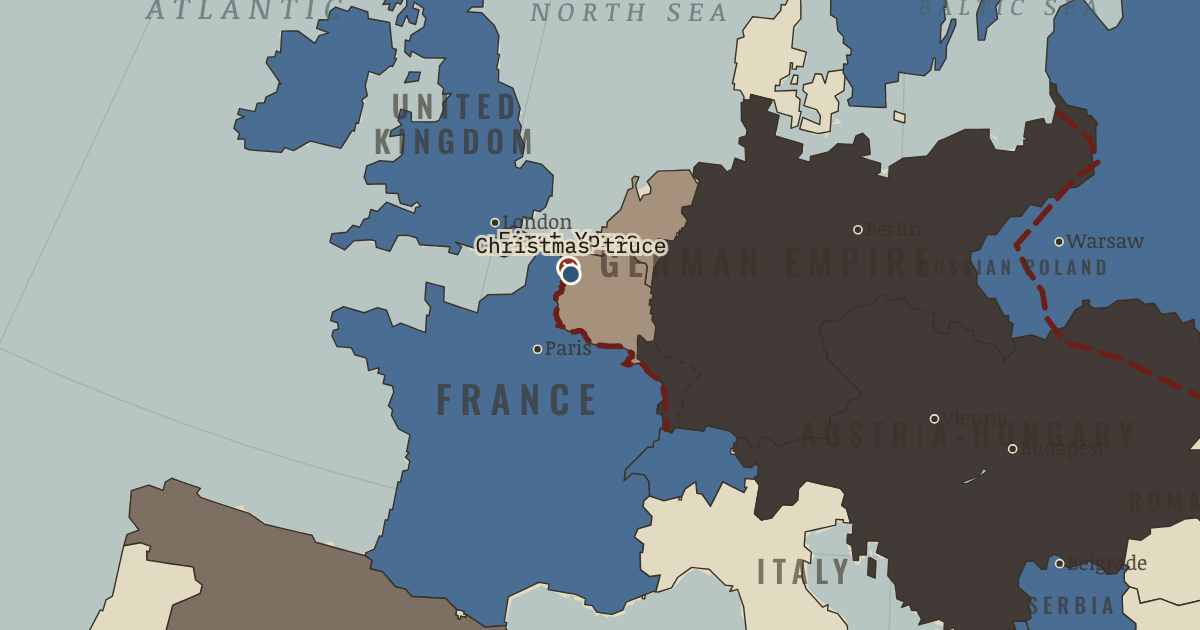
The map above is the world of Europe, November 1914 — The Ottomans enter.
Every state on the map that year: The world in 1914 · Europe in 1914.
Part of IB History: The First World War →
SHORT EXPLANATION
By the end of 1914, rapid advances in western Europe had given way to a front that would move little for almost four years. The attackers had to cross open ground under machine-gun and artillery fire, often after wire had slowed them down. Even if they reached the first position, the defenders could bring reserves by railway while the attackers struggled over the ground their own bombardment had broken.
The line was a system, not simply a ditch. Communication trenches joined forward positions to support and reserve lines, and dug-outs gave men shelter. Yet governments could not treat the stalemate as a reason to stop fighting: occupied territory had to be recovered and allies under pressure needed help. Armies searched for ways through the defenses while entire societies supplied the men holding them.
The full story
The dashed line on the map stretches roughly seven hundred kilometres from the North Sea to the Swiss border. After the campaigns of 1914, it stayed in much the same place for years. To cross the ground in front of it, infantry had to pass through wire under machine-gun and artillery fire. A defender who saw a sector threatened could bring reserves by railway; the attackers had to walk across ground torn up by shells.
A trench was also a way of keeping an army in place. Behind the forward line lay support and reserve positions, reached by communication trenches, with dug-outs for shelter and routes for supplies. Men rotated through the system. Boredom and disease were part of their experience, as were raids and sudden violence. At Christmas 1914, troops in some sectors stopped fighting together; elsewhere the war continued.
Why did a breach so often fail to produce an advance? The infantry needed orders, ammunition and guns to follow them. Yet the bombardment that helped them take the first position had damaged the roads, and shellfire cut telephone wires. As the attackers moved beyond their artillery support, defenders could bring reserves along railways to another line. The longer Eastern Front was held more thinly and moved much more; in the densely manned west there was little room to turn a flank.
Governments nevertheless wanted offensives to recover occupied territory and relieve allies. Gas, mines, creeping barrages, aircraft, tanks and new small-unit tactics offered ways to tackle parts of the problem, while defenders adapted to each. Sustained movement eventually required changes in organization as well as weapons. Armies had to make those changes while the political demands for attack continued.
FULL EXPLANATION
Firepower and the problem of movement
A bombardment could wreck a forward position. It could not by itself carry an army through the gap. Magazine rifles, machine guns and recoil-controlled artillery made exposed infantry vulnerable, and once an advance began, commanders had trouble keeping in touch with it. Runners took time, field telephone wires were cut by shells, and radios were rare and bulky. Guns and ammunition meanwhile had to cross the same cratered ground as the infantry. Defenders could use the delay to bring reserves to the breach. The difficulty was therefore not simply making a hole but exploiting it before it closed. By 1918 predicted artillery fire, tanks, aircraft, dispersed infantry tactics and better logistics had narrowed that gap. The trench war was a costly transition in technology and organization, rather than a permanent law that defense must always prevail.
Learning while the war continued
The phrase “lions led by donkeys” makes a judgment about commanders, but leaves the problem they faced unexplained. Some were rigid, hid failures or accepted losses too readily; others changed their methods. France could not readily accept the occupation of its land, Britain had allies under pressure, and Germany sought a decision before the blockade and its enemies’ greater resources took effect. Within those constraints armies tried gas, mines, creeping barrages, small-unit tactics and tanks. Defenders adapted too, so each innovation began another contest rather than ending the war. Commanders can still deserve severe criticism. The useful questions are what they intended, how they prepared and whether they changed course in response to evidence. In industrial war, the fact of casualties alone cannot answer them.
Key places on the map
On this day
Why it happened
Firepower and mobility. From 1870 to 1914, magazine rifles, machine guns and recoil-absorbing artillery greatly increased firepower. Movement and communication changed less: infantry walked, horses pulled guns, and orders passed by whistle, runner or vulnerable wire. A force could tear a hole without getting through it before the enemy closed it. By 1918 tanks, trucks and ground-attack aircraft contributed to greater mobility, although equipment alone was not enough.
Railways behind the front. Western defenders could shift reserves along lateral railways, sometimes moving a division overnight. The attacker's route was harder. Its bombardment damaged roads, captured railways might need conversion, and horses hauled ammunition over churned ground. As an advance extended, its guns and supplies had farther to travel just as reinforcements approached the defense.
Men and space. The west had millions of men along roughly 700 kilometres, leaving few open flanks. On the Eastern Front, a similar number occupied about twice the distance, and the line moved much more. The amount of force available for the space mattered. Maneuver returned in Palestine and Macedonia in 1918 where density and other conditions permitted it; trench deadlock was not universal.
Why attack continued. German forces held French and Belgian soil, and French governments wanted it back. Coalition partners also had to consider one another: pressure at Verdun helped prompt British attacks, and helping Russia was among the purposes of the Gallipoli campaign and its attempt to open the straits. These were real constraints on commanders' choices, though they did not excuse poor preparation or refusal to learn.
THE TURNING POINT
First Ypres, October–November 1914. At First Ypres, the outnumbered British Expeditionary Force helped stop Germany's drive toward the Channel ports. Its regular infantry paid heavily. Accounts of their rapid rifle fire include German reports that mistook it for machine guns. After the autumn fighting, a continuous front ran from the North Sea to the Swiss frontier: there was no longer an open flank to turn in the west.
What it changed
Attrition and resources. When armies could not readily break through, wearing down the enemy became central to their plans. Verdun and the Somme in 1916 made casualties and the ability to replace men and equipment important alongside the ground gained. The line on the map depended on population, production and supply.
Experiments in siege warfare. Poison gas (Chapter 6), mines and counter-mines, aerial photography, sound-ranging, creeping barrages and tanks were all tried against the defenses. Each opened possibilities, and each encountered countermeasures. By 1918 armies could sustain advances more effectively by combining methods and improving their organization.
The demands on civilians. Keeping armies in the field required labor and supplies far from the front. Britain introduced conscription in 1916; women entered war industries in large numbers; governments controlled food and policed dissent. Civilians had already suffered violence at Louvain. Chapter 8's blockade raises another question about war's reach beyond the battlefield.
DISCUSSION QUESTION — How far does “lions led by donkeys” explain the Western Front?
The phrase has force where commanders persisted with poor methods, concealed failure or accepted losses too readily. It cannot, by itself, explain a front where even capable commanders faced defensive fire, ruined ground and reserves arriving behind the line. Political and alliance obligations also pressed them to attack. Armies learned: compare the first day of the Somme with the British Expeditionary Force's combined-arms methods in 1918 (Chapter 12). We should judge a commander by the objective, preparation and response to evidence as well as the cost. Some adapted better than others, and learning itself carried a terrible price.
An interesting fact
The Christmas truce of 1914 was a patchwork of local episodes, especially between British and German troops around Ypres; fighting continued elsewhere. Letters tell of carols answered across no-man's-land, joint burials and exchanges of buttons and tobacco. There were improvised football games too, but the celebrated organized match with a 3–2 score rests on thin, secondhand testimony. Commanders tried to prevent a repeat in 1915: orders threatened courts-martial, a Scots Guards captain faced one, and artillery shoots were scheduled for Christmas Day.
Related
THE FREE PRINTABLE STUDY GUIDE
Get the printable study guide for WWI free. I’ll send you a few short letters, then one when a new atlas opens. That’s all. — Paul
NO TRACKING · YOUR ADDRESS IS USED FOR THE DISPATCH AND NOTHING ELSE · UNSUBSCRIBE ANYTIME