MAPS OF HISTORY · WW2 · ALL CHAPTERS · CHAPTER 4
CHAPTER 4 · JUL–OCT 1940 · AUG 1940
The Battle of Britain
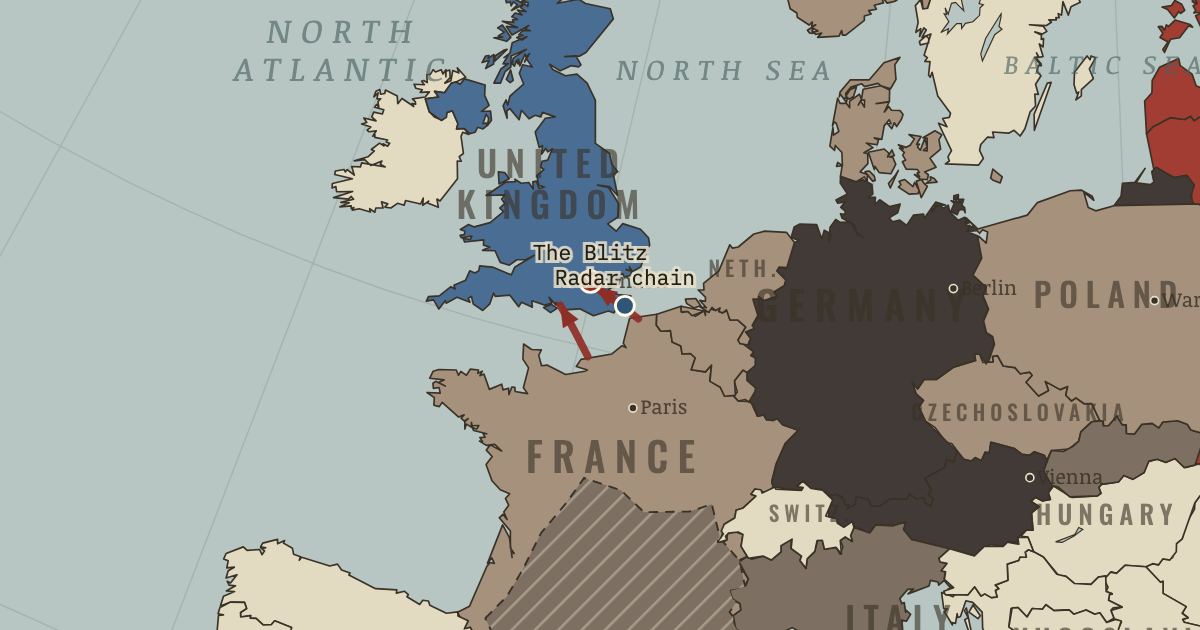
The map above is the world of JUN 1940 — France falls.
BRIEF EXPLANATION — THE ESSENTIAL ARGUMENT
After France fell, Britain stood alone, and the Battle of Britain decided whether Germany could finish the war in the west. Any German invasion had to cross the Channel, and the weakened German navy could not protect slow invasion barges from the powerful Royal Navy unless the Luftwaffe first drove the Royal Air Force from the sky. Through the summer of 1940 the Luftwaffe therefore attacked Channel shipping, radar stations, and above all the airfields of RAF Fighter Command. Britain met the assault with an integrated defensive system that linked radar, ground observers, control rooms, and fighter squadrons into a single machine for guiding scarce aircraft to the right place at the right time.
In early September Germany shifted the weight of its attack toward London, partly in reprisal for British raids on Berlin. The change eased the pressure on Fighter Command’s battered airfields and gave the defence time to recover. Mounting German losses and Britain’s continued resistance led Hitler to postpone the invasion indefinitely on 17 September. The city suffered terribly in the bombing that followed, yet Britain remained in the war, and its survival preserved the island base from which the Western Allies would one day return to the Continent.
GUIDED EXPLANATION
Operation Sea Lion, the German plan to invade Britain, depended entirely on winning control of the air. The German navy, battered in the Norwegian campaign, could not shield a slow invasion fleet from the Royal Navy while RAF Fighter Command remained effective, so the Luftwaffe set out to destroy that force. It struck at shipping, radar stations, sector airfields, and aircraft factories. Britain’s advantage lay in more than radar alone, because information gathered by radar and observers flowed into control rooms that then directed limited fighter forces to intercept incoming raids where they mattered most.
By early September the battle had grown costly for both sides, and Britain’s supply of trained pilots was under severe strain. On 7 September the Luftwaffe redirected its main effort against London. This did not end the attacks on airfields, and historians still dispute how close Fighter Command came to defeat, yet the shift relieved the sustained pressure on the defensive system at its weakest moment. London endured heavy bombing in the campaign known as the Blitz, but the destruction did not compel surrender. On 17 September Hitler postponed the invasion, and Germany had failed in its first attempt to knock Britain out of the war.
Geography and production quietly reinforced the defensive system. A British pilot who survived a crash over home soil could soon fly again, while a German airman shot down over Britain was usually lost as a prisoner, and British factories replaced fighters faster than Germany had believed possible. The Luftwaffe also lacked both a stable target plan and the heavy bombers needed to grind down an entire economy. The victory was nonetheless narrow enough to puncture easy myths, because radar did not make interception automatic and civilian endurance did not make bombing harmless. Britain survived because information, aircraft, pilots, command, and political resolve all held together at once. That survival kept a western foothold in the war and preserved the link through which American material aid reached an ally still fighting in Europe.
DEEP EXPLANATION — EVIDENCE & INTERPRETATION
The system behind the fighters
The Dowding system tied together Chain Home radar, the Observer Corps, telephone networks, filter rooms, sector stations, and the fighter squadrons themselves, and its real purpose was the efficient allocation of scarce resources. Britain did not have to patrol every mile of sky, because controllers could estimate where a raid was heading and send just enough aircraft to meet it, saving fuel, airframes, and exhausted pilots. German intelligence saw the individual components but never grasped the network that joined them, so its attacks were rarely concentrated on the system’s critical links. The network had real limits, since radar reached poorly inland, communications could fail, and the sector airfields were themselves vulnerable. The battle nonetheless demonstrates a clear pattern, which is that a well-designed network can matter more than any single weapon. Destroying aircraft without disabling the information and command behind them allowed Fighter Command to regenerate, which is why British victory is best explained through organization, geography, and production rather than national spirit alone.
Why bombing did not coerce surrender
Strategic bombing tries to change an enemy’s behaviour by destroying its capacity, its morale, or both, and the Blitz is a clear test of whether that works. The bombing killed tens of thousands of civilians and caused serious damage, yet it never offered British leaders a safer political choice than continued resistance, and indiscriminate attacks could even strengthen public solidarity. This does not mean that morale was unbreakable, because evacuation, unequal access to shelter, fatigue, and fear were all real. It means that coercion depends on a mechanism, and the Luftwaffe lacked the heavy-bomber force required to sustain a campaign against the whole British economy while Fighter Command and aircraft production survived. Switching targets to London also let the damaged airfields recover. Later Allied bombing of Germany would produce similarly mixed results, inflicting enormous industrial and human costs without the simple collapse that prewar theorists had predicted. Air power mattered greatly, but terror by itself did not reliably produce surrender.
The WW2 atlas is free in full — no sign-up.
THE SITES
ON THIS DAY
WHY IT HAPPENED
Sea Lion’s impossible arithmetic. Germany’s navy, gutted off Norway, could never protect an invasion fleet from the Royal Navy — unless the Luftwaffe owned the sky completely. Air superiority wasn’t one condition; it was the only condition.
Hitler expected a deal. He never planned a war with Britain and half-hoped a show of force would bring negotiation. The air campaign was improvised, with no clear target priorities — and it showed.
The world’s first integrated air defense. Chain Home radar, ground observers, and sector control rooms let Fighter Command see raids forming over France and meet them with exactly enough force. Germany never understood the system it was fighting — it kept attacking the planes and ignoring the network.
THE TURN
The system holds, 15 September. On “Battle of Britain Day” the Luftwaffe mounts its maximum effort against London — and radar-guided squadrons meet every wave. Losing 2:1, Berlin concludes the RAF is unbreakable. Two days later, invasion is postponed indefinitely.
WHAT IT CHANGED
The first hinge. Britain’s survival keeps a western front possible — the aircraft carrier off Europe’s coast from which everything in 1944 will be launched.
Hitler turns east early. If Britain won’t fall, Hitler reasons, her last hope is Russia — so destroy Russia and Britain must yield. Barbarossa planning begins in earnest that autumn, in strategic frustration as much as ideology.
America starts to lean in. Britain’s stand — broadcast nightly into US living rooms during the Blitz — shifts American opinion. Destroyers-for-bases, then Lend-Lease (March 1941): the “arsenal of democracy” starts arming the fight it hasn’t joined.
FIELD QUESTION — Why was switching the bombing from airfields to London a war-losing mistake?
Fighter Command was the military system blocking invasion. Sustained attacks on its airfields and trained pilots threatened that system. The shift toward London dispersed German effort and gave parts of the defense time to recover. Bombing civilians caused immense harm but did not create surrender. The judgment needs caution: Fighter Command was under pressure, not certainly days from collapse.
AN INTERESTING FACT
Nearly one in five of the “Few” was not British: Fighter Command’s roll that summer includes 145 Poles, 88 Czechoslovaks, and pilots from a dozen other nations — among them a handful of Americans who had slipped into Canada to enlist while their own country was still neutral. No. 303 (Polish) Squadron, committed to battle only on 31 August, finished as one of the highest-scoring units of the entire battle. The airmen of the country partitioned in Chapter 2 helped save the island from which its liberation would one day be staged.
THE DISPATCH
One short letter when a new atlas opens — and the printable study guide for WW2 is yours now, free.
NO TRACKING · YOUR ADDRESS IS USED FOR THE DISPATCH AND NOTHING ELSE · UNSUBSCRIBE ANYTIME